Modern living room with a white WiFi router on a central shelf surrounded by a laptop, smartphone, and tablet with loaded web pages, bright natural daylight
How to Get WiFi at Home for First-Time Users

Content
Setting up WiFi in your house involves more than just unboxing equipment and crossing your fingers. You're choosing an internet provider, buying or renting hardware, and configuring settings that determine whether Netflix buffers during the good parts or loads instantly.
This walkthrough covers every decision point—which internet plan actually matches your usage patterns, whether that $14.99/month router rental makes financial sense, and where to position your equipment so you're not standing in the kitchen doorway to load Instagram. You'll see what mistakes create dead zones in your bedroom and why your "blazing fast" internet crawls at certain times.
Understanding What You Need Before Getting WiFi
"Internet" and "WiFi" get tossed around like synonyms, but they're completely different things. Grasping this difference prevents confusion when customer service asks which one isn't working.
The Difference Between Internet Service and WiFi
Your internet service provider delivers a data connection to your residence through coaxial cables, telephone lines, or fiber optic infrastructure. That's the pipeline bringing Google, TikTok, and everything else into your physical location. WiFi is just the wireless broadcasting method that lets your phone access that pipeline without plugging in a cable.
Here's a practical example: plug an ethernet cable from your wall jack directly into your laptop. You've got internet, zero WiFi involved. Now unplug that cable and try to connect wirelessly—if there's no router broadcasting a signal, your laptop sees nothing to connect to. When you're paying Spectrum or Verizon each month, that's for the internet service itself. The WiFi capability comes from adding a router that broadcasts the connection wirelessly throughout your space.

Author: Marcus Leland;
Source: flexstarsolutions.com
Modem vs. Router: What Each Device Does
These boxes serve entirely separate functions, though manufacturers now sell combination units.
Your modem translates the signal arriving through the cable/phone/fiber line into digital data your devices understand. It's essentially an interpreter converting your ISP's infrastructure language into something your laptop or phone can work with. No modem? No internet access, period.
Routers distribute that translated connection across multiple devices simultaneously. They establish your home network, manage IP addresses, broadcast the wireless signal your devices detect, and include firewall protections against external threats. Without a router, you'd need separate modems for every single device—wildly impractical.
Gateway devices merge both functions into one box. Your provider probably offers these. They handle basic needs adequately but typically lack advanced features like robust parental controls, detailed device management, or the coverage range standalone routers provide.
Choosing the Right Internet Plan for Your Home WiFi
Finding an internet plan means matching bandwidth to actual usage, not just grabbing whatever's cheapest or fastest.
Speed Requirements by Household Size
Someone living alone watching YouTube has vastly different needs than four roommates simultaneously streaming, gaming, and video calling.
One or two users doing email, social media, and standard-definition streaming get by comfortably on 50-100 Mbps. You won't see buffering circles unless you're downloading 50GB games while running three video streams—unlikely for most solo dwellers or couples.
Three to four people sharing a connection need 200-300 Mbps minimum to prevent bottlenecks. This supports simultaneous HD streaming across multiple TVs, Zoom calls for remote work, and someone gaming online without everyone else's connections tanking. If your household includes remote workers hosting frequent video meetings, aim for the higher end—upload speed matters for video calls, and many plans offer asymmetric speeds (fast downloads, slower uploads).
Five-plus people, or homes with competitive gamers and multiple 4K TVs running simultaneously, should target 500 Mbps or more. Heavy concurrent usage creates congestion quickly. Also consider that "500 Mbps" gets divided among active users—five people streaming simultaneously might each effectively see 100 Mbps or less during peak usage.
Comparing Provider Options in Your Area
Which providers actually serve your address varies wildly. Rural zip codes might have one DSL option, while downtown apartments could have six providers competing.
Go to each company's website and input your exact street address—not just your ZIP code. Availability changes block by block. A provider advertising heavily in your city might not have infrastructure on your specific street.
| Connection Type | Speed Range | Monthly Cost Range | Where Available | Ideal Users | Main Benefits | Main Drawbacks |
| DSL | 5-100 Mbps | $40-$60 | Most areas with phone line infrastructure | Single users, rural locations with limited options | Available almost everywhere, budget-friendly | Slower than alternatives, speed degrades with distance from junction box |
| Cable | 100-1000 Mbps | $50-$100 | Cities and suburbs | Average families, most typical households | Solid speeds, established reliability | Neighborhood congestion during peak hours (6-10 PM) |
| Fiber Optic | 500-5000 Mbps | $60-$150 | Select metro areas, expanding slowly | Power users, large families, remote workers | Maximum speeds available, identical upload/download speeds | Geographic availability extremely limited |
| 5G Home Wireless | 50-300 Mbps | $50-$70 | Growing coverage in urban centers | Renters avoiding contracts, temporary housing | No installation appointments, take it when moving | Performance depends heavily on tower proximity and signal obstacles |
Read recent reviews from customers in your neighborhood specifically. A company might deliver excellent service in Phoenix but terrible reliability in Tampa based on infrastructure age, local maintenance practices, and regional support quality.
Should You Buy or Rent Your Modem and Router?
Most ISPs rent equipment for $10-$15 monthly. Multiply that by 24 months—you've paid $240-$360, often exceeding the purchase price of better equipment.
A solid modem runs $80-$150 and typically functions reliably for four to six years before WiFi standards advance enough to justify replacement. Quality routers range from $100-$300 based on coverage area and feature sets. Buying both upfront costs $200-$400 but breaks even within 12-18 months compared to rental fees.
Renting makes sense in specific scenarios. Frequent movers who might switch providers in six months avoid being stuck with incompatible owned equipment. Some ISPs bundle free tech support exclusively for rental customers—if troubleshooting router admin panels sounds like Mandarin to you, that support access carries genuine value. A few providers automatically upgrade rental equipment every couple years, keeping you current with WiFi standards.
Purchasing equipment gives you quality control and feature access. ISP-provided boxes often run outdated firmware and omit features like guest networks, advanced parental controls, or detailed device management. You can select hardware with superior range, current WiFi 6 standards, and additional ethernet ports for wired connections.
Before purchasing anything, verify your provider accepts it. Most cable companies work with any DOCSIS 3.0 or 3.1 certified modem, but fiber services frequently require proprietary equipment or specific approved models. Check your ISP's compatibility list online or call support to confirm before buying.
Author: Marcus Leland;
Source: flexstarsolutions.com
Step-by-Step: How to Set Up WiFi at Home
Once your service activates and equipment arrives, actual setup consumes 30-45 minutes following this methodical approach.
Installing Your Modem and Router
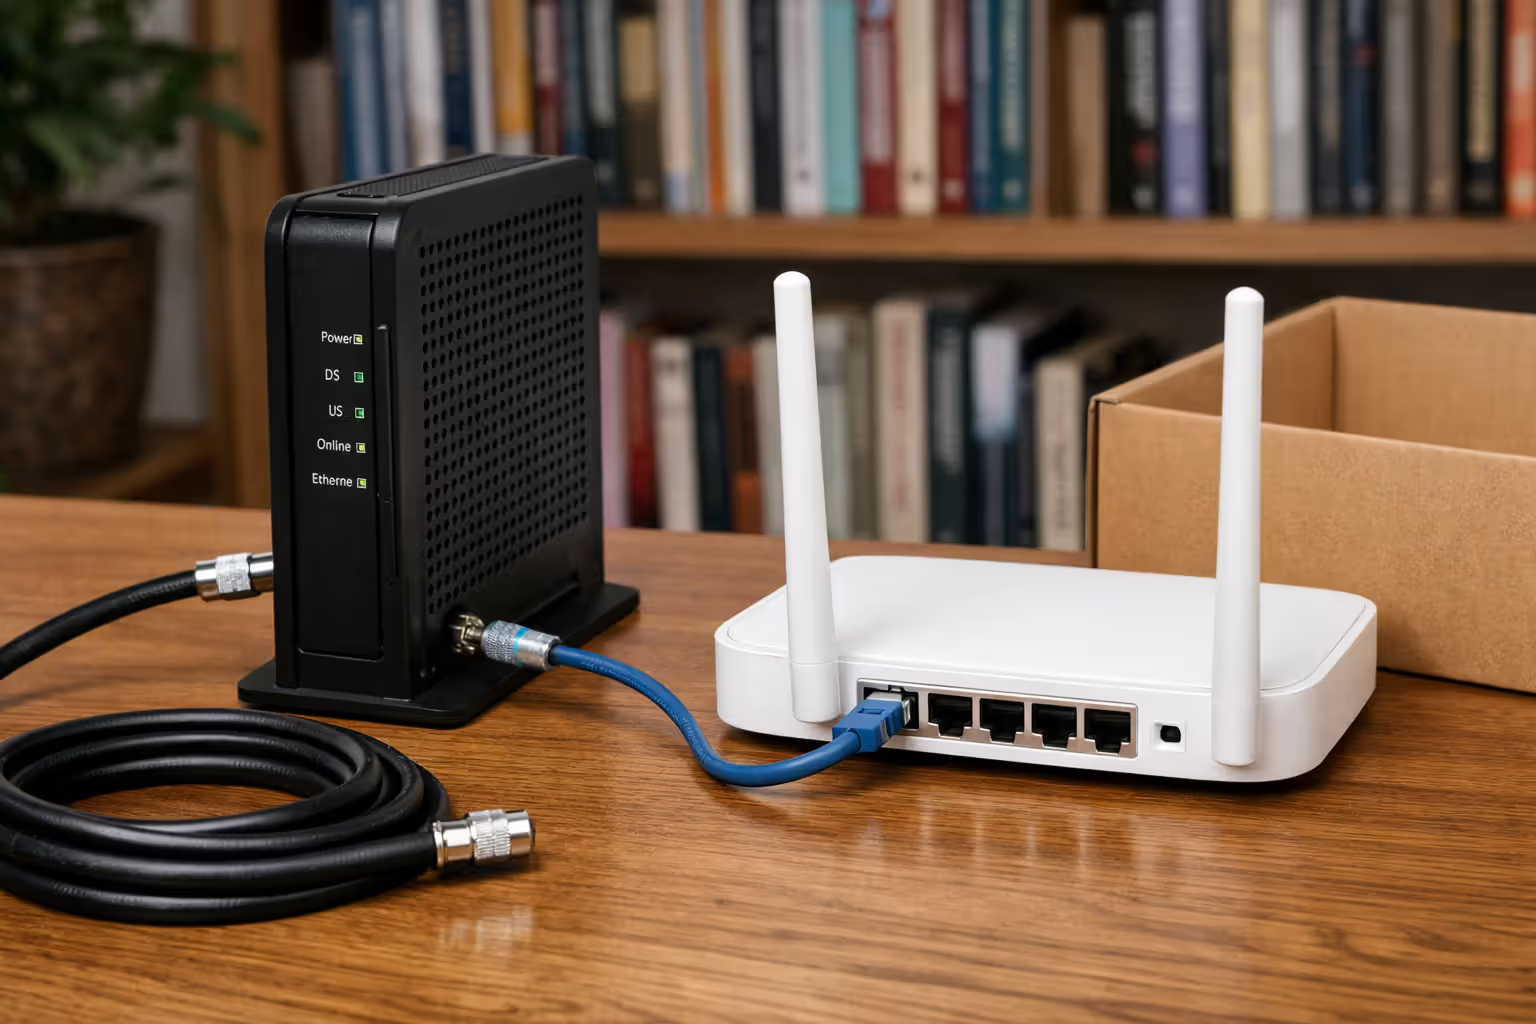
Begin with modem connections. Attach the coaxial cable (cable internet) or phone line (DSL) to the corresponding port on your modem. Fiber customers usually have an ONT (optical network terminal) already installed by a technician—you'll connect your router to that box using ethernet.
Power up the modem and wait three to five minutes for complete initialization. Front panel lights indicate status—you're looking for solid lights labeled power, downstream, upstream, and online (terminology varies by model). Blinking or dark lights signal connection failures requiring troubleshooting.
Run an ethernet cable from the modem's ethernet port to your router's WAN or Internet port (often highlighted in yellow or blue). Power up the router and give it another two to three minutes to boot completely.
Connect your computer to the router via ethernet or join the default WiFi network. Default credentials appear on a sticker attached to the router—something like "NETGEAR47" with password "elegantmoose423."
Configuring Your WiFi Network Settings
Launch any web browser and type the router's IP address in the address bar. Common addresses include 192.168.1.1 or 192.168.0.1, though your router's manual specifies the exact address. A login screen appears—default username and password are documented in the manual or printed on the router sticker (often "admin" and "password").
Immediately change that default admin password. Leaving it as "admin/admin" invites anyone within WiFi range to access your router settings and wreak havoc.
Find the wireless settings section (location varies by router brand). Change your network name (SSID) to something recognizable but generic. "Johnson Family Network" broadcasts your identity to neighbors; something like "PurpleMonkey847" provides no identifying information.
Current routers broadcast dual bands: 2.4 GHz and 5 GHz. You can assign identical names (devices automatically select the optimal band) or separate names (you manually choose which band each device uses). The 2.4 GHz frequency penetrates walls better but delivers slower maximum speeds. The 5 GHz band runs faster but struggles getting through floors and thick walls.
Securing Your Network with a Strong Password
Create a WiFi password containing at least 12 characters—mix uppercase letters, lowercase letters, numbers, and symbols randomly. Skip dictionary words, family names, or birth dates. "Phoenix2026!" cracks easily; "m9#Lq2$kP5wR" poses actual difficulty for attackers.
In security settings, enable WPA3 if your router supports it. Older routers should use WPA2 minimum. Never select WEP or the original WPA—both have known vulnerabilities that security researchers cracked years ago.
Think about disabling WPS (WiFi Protected Setup). Yes, it's convenient for connecting devices via button-pushing instead of password typing, but security researchers have demonstrated WPS vulnerabilities that let hackers access networks.
Set up a guest network allowing visitors internet access without exposing your main network and connected devices like security cameras, smart thermostats, or network-attached storage drives.
WiFi Setup Checklist: - Modem linked to service line and receiving power - Ethernet cable connecting modem to router - Default admin password replaced with unique credentials - Network name customized to something non-identifying - Complex WiFi password created (minimum 12 mixed characters) - WPA2 or WPA3 protection activated - Guest network established for visitors - Latest firmware update installed - Successful connection verified across multiple devices
Where to Place Your Router for Maximum Coverage
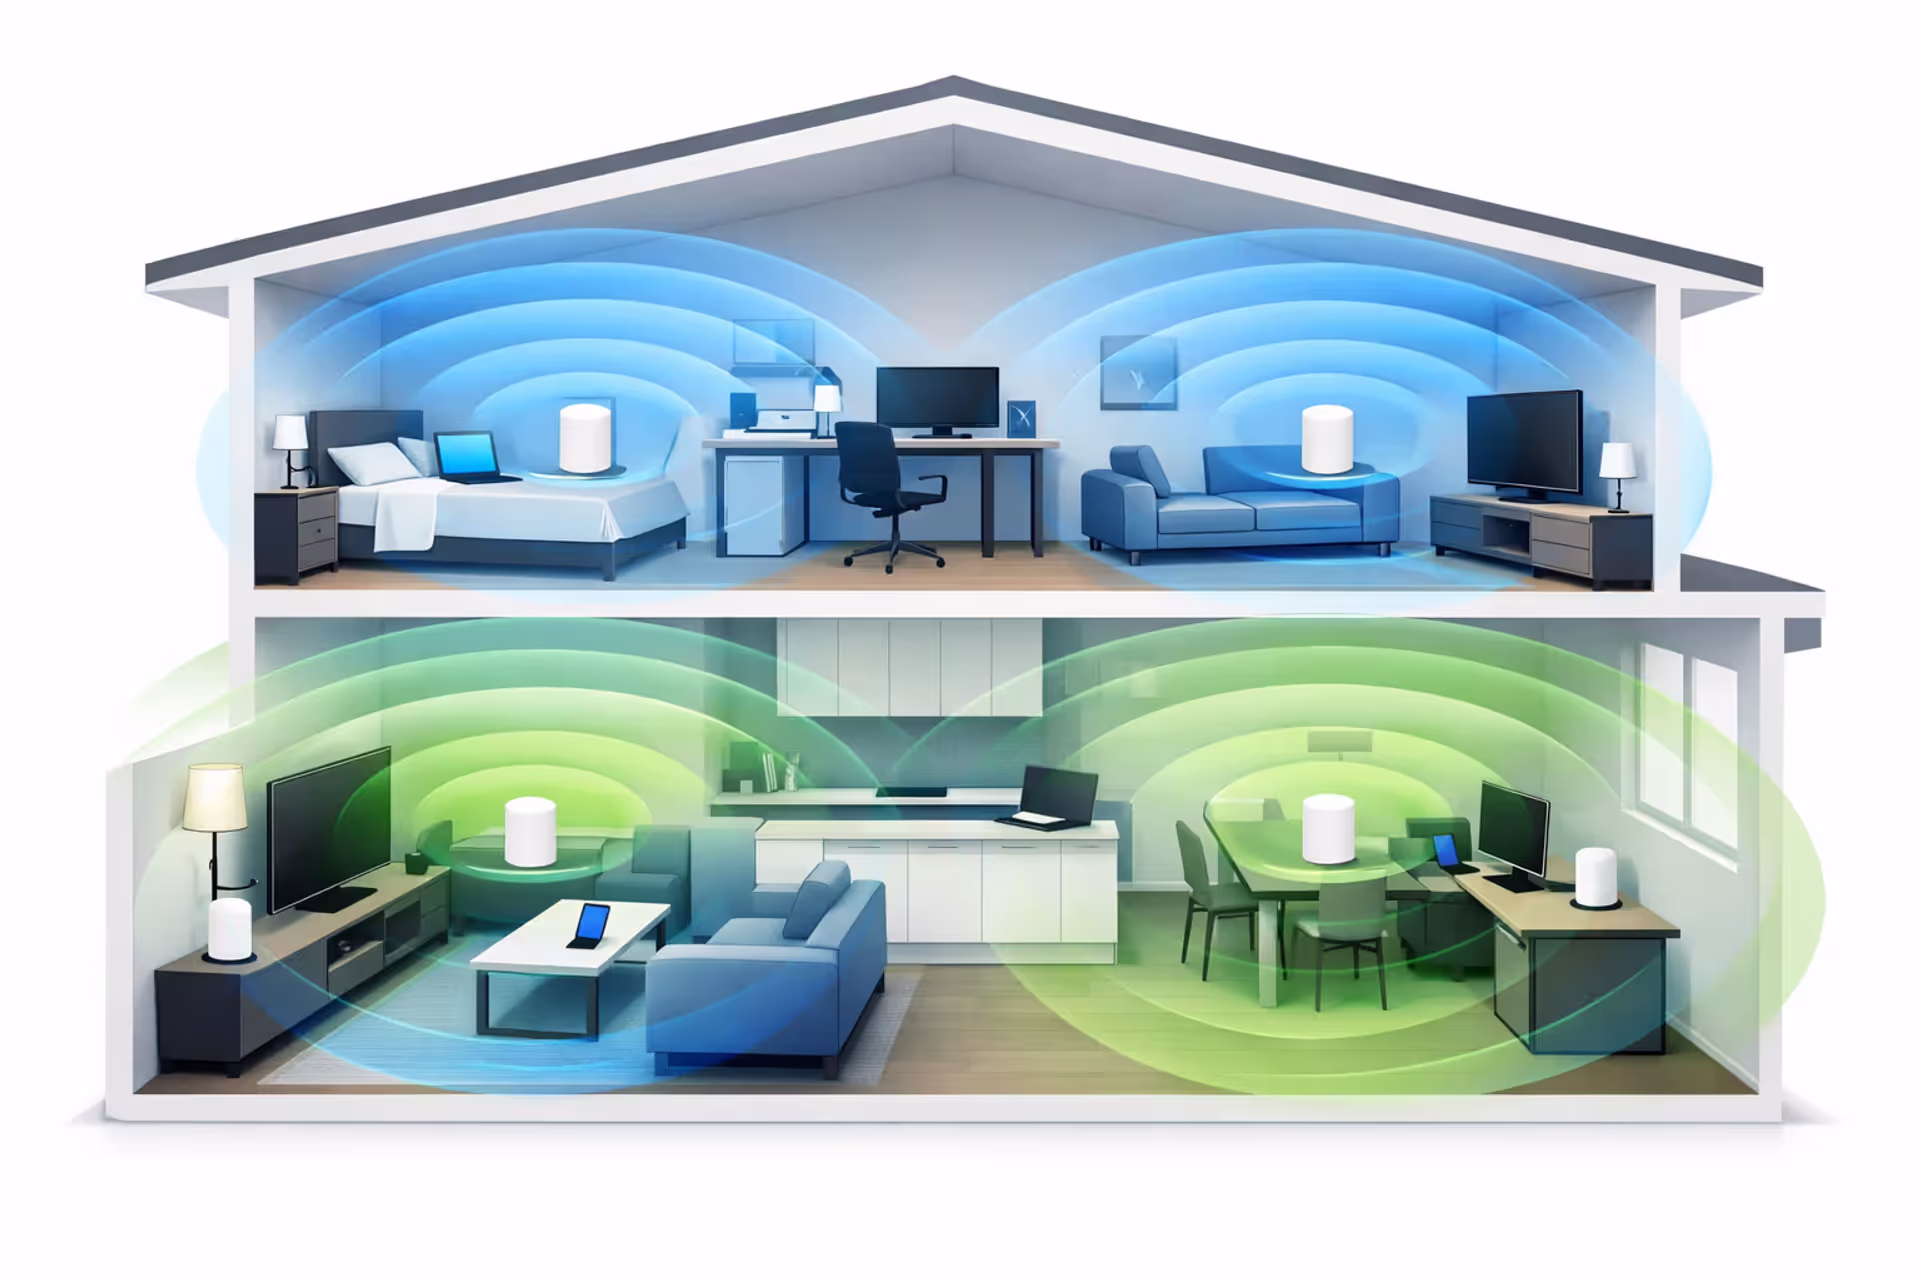
Where you position your router impacts performance more dramatically than most people expect. WiFi signals radiate outward spherically, making location critically important.
Position your router centrally on your home's main floor. Two-story houses benefit from first-floor ceiling-height placement—mount it on a wall or place it on a tall shelf so signals reach both levels effectively. Basement placement forces signals through concrete foundations and floor joists, severely degrading strength.
Distance your router from thick walls, metal furniture, and electromagnetic interference sources. Microwaves, cordless landline phones, baby monitors, and Bluetooth speakers all broadcast on frequencies that create WiFi interference.
Where you put your router changes your actual WiFi performance by 40% or more. We consistently see central, elevated placements on the main living floor outperform corner locations and basement installations by massive margins
— Marcus Chen
Never hide your router inside cabinets, closets, or behind couches. Signals need unobstructed paths for optimal propagation. An open shelf or desk in a central room beats a hidden corner office location every time.
Multi-story homes or layouts with numerous walls sometimes exceed single-router coverage capabilities. Dead zones—areas with weak or absent WiFi signal—indicate you need stronger equipment or a mesh network installation.
7 WiFi Setup Mistakes That Kill Your Connection Speed
1. Running ancient equipment from 2015 or earlier. WiFi technology has evolved massively. Routers more than five years old likely max out at WiFi 5 (802.11ac) standards, missing WiFi 6 improvements in speed and simultaneous device handling. Paying for 500 Mbps service but using a router capped at 300 Mbps wastes money monthly.
2. Tucking the router in corners or closets. Signal strength decreases exponentially with obstacles and distance. That convenient corner office might simplify cable management, but it forces signals through maximum building structure to reach distant rooms.

Author: Marcus Leland;
Source: flexstarsolutions.com
3. Never adjusting the default WiFi channel. Routers auto-select channels initially, but apartment buildings might have 30+ networks competing on identical channels. Manually selecting a less-crowded channel using WiFi analyzer apps can double your effective speed in congested areas.
4. Sticking with ISP-provided gateways despite paying for 400+ Mbps service. Budget equipment from providers often bottlenecks speeds you're paying for, particularly with many simultaneous connections. Their hardware targets "adequate" performance, not optimization.
5. Ignoring firmware updates for multiple years. Manufacturers release updates patching security holes and improving performance. Check quarterly for updates, or activate automatic updates if available on your model.
6. Leaving networks open or using ancient WEP encryption. Unsecured networks invite neighbors to consume your bandwidth and expose your traffic to eavesdropping. WEP encryption was publicly cracked before 2010. Only WPA2 and WPA3 provide legitimate security.
7. Connecting 20+ IoT devices to routers designed for 10 connections maximum. Pre-2019 routers lack MU-MIMO and beamforming capabilities that efficiently manage numerous simultaneous connections. Smart bulbs, security cameras, smart thermostats, and voice assistants accumulate faster than you realize—suddenly you've got 25 devices competing for router attention.
When to Upgrade to a Mesh WiFi System
Single-router configurations handle apartments and compact homes under 1,500 square feet with minimal interior walls adequately. Exceed that size or add multiple stories with substantial interior walls, and single routers struggle maintaining consistent coverage.
You need mesh systems when dead zones appear in bedrooms or outdoor spaces, connections drop while moving between rooms, or speeds plummet in certain areas despite fast service. If repositioning your router hasn't resolved coverage problems, mesh solves it.
Mesh networks deploy multiple nodes throughout your space, creating one unified network devices transition between seamlessly. Unlike old-school WiFi extenders that halved bandwidth and created separate network names, mesh nodes communicate via dedicated wireless channels while maintaining full speeds.

Author: Marcus Leland;
Source: flexstarsolutions.com
Standard three-node mesh systems cover 4,000-6,000 square feet effectively. Two-story houses typically need one node per floor plus one additional for problem areas. Brick construction, stucco exterior walls, or metal studs require more nodes than wood-frame construction.
Mesh systems cost more initially—$200-$500 for three-pack setups—but eliminate coverage frustration completely. They're particularly valuable for smart home installations where devices scatter throughout the house requiring stable connections continuously.
Frequently Asked Questions About Home WiFi Setup
Establishing reliable home WiFi goes beyond unboxing a router and powering it on. You're matching internet service to household usage patterns, selecting equipment that won't create speed bottlenecks, and implementing security configurations that protect your network while optimizing performance.
Early decisions—purchasing versus renting hardware, where you physically position equipment, which security protocols you enable—create either reliable daily connectivity or endless frustration. Investing time in proper router positioning and avoiding widespread setup errors pays off every single day you use the network.
Start by honestly evaluating your speed requirements based on simultaneous users and devices. Research available providers using real customer reviews from your specific neighborhood, not just citywide ratings. If purchasing equipment, triple-check compatibility before buying anything.
Work through the setup checklist systematically, emphasizing security configurations and strategic router placement. Test coverage throughout your entire space before assuming everything works perfectly. Discovering dead zones might require simple repositioning—or might indicate you need mesh coverage for your layout.
This network infrastructure gets used dozens of times daily by every household member. Proper initial setup prevents ongoing headaches and ensures you actually receive the performance you're paying for monthly.