Modern white WiFi router on a wooden shelf in a bright living room with Ethernet cables and a smartphone showing WiFi settings nearby
How to Set Up WiFi in Your Home for Full Coverage

Content
That router box has been sitting on your counter for three days now. You keep looking at it, thinking "I should really set this up," but every time you open it and see the tangle of cables and blinking lights, you find something else that suddenly needs doing.
Setting up WiFi sounds complicated, but I've watched my 68-year-old aunt do it over FaceTime in 27 minutes. Sure, she called me panicking twice, but she got online. The real trick isn't technical skill—it's knowing where to actually put the thing and which cables matter (spoiler: only two of them do).
What You Need Before You Start
Let's inventory what's actually necessary versus what's just extra packaging.
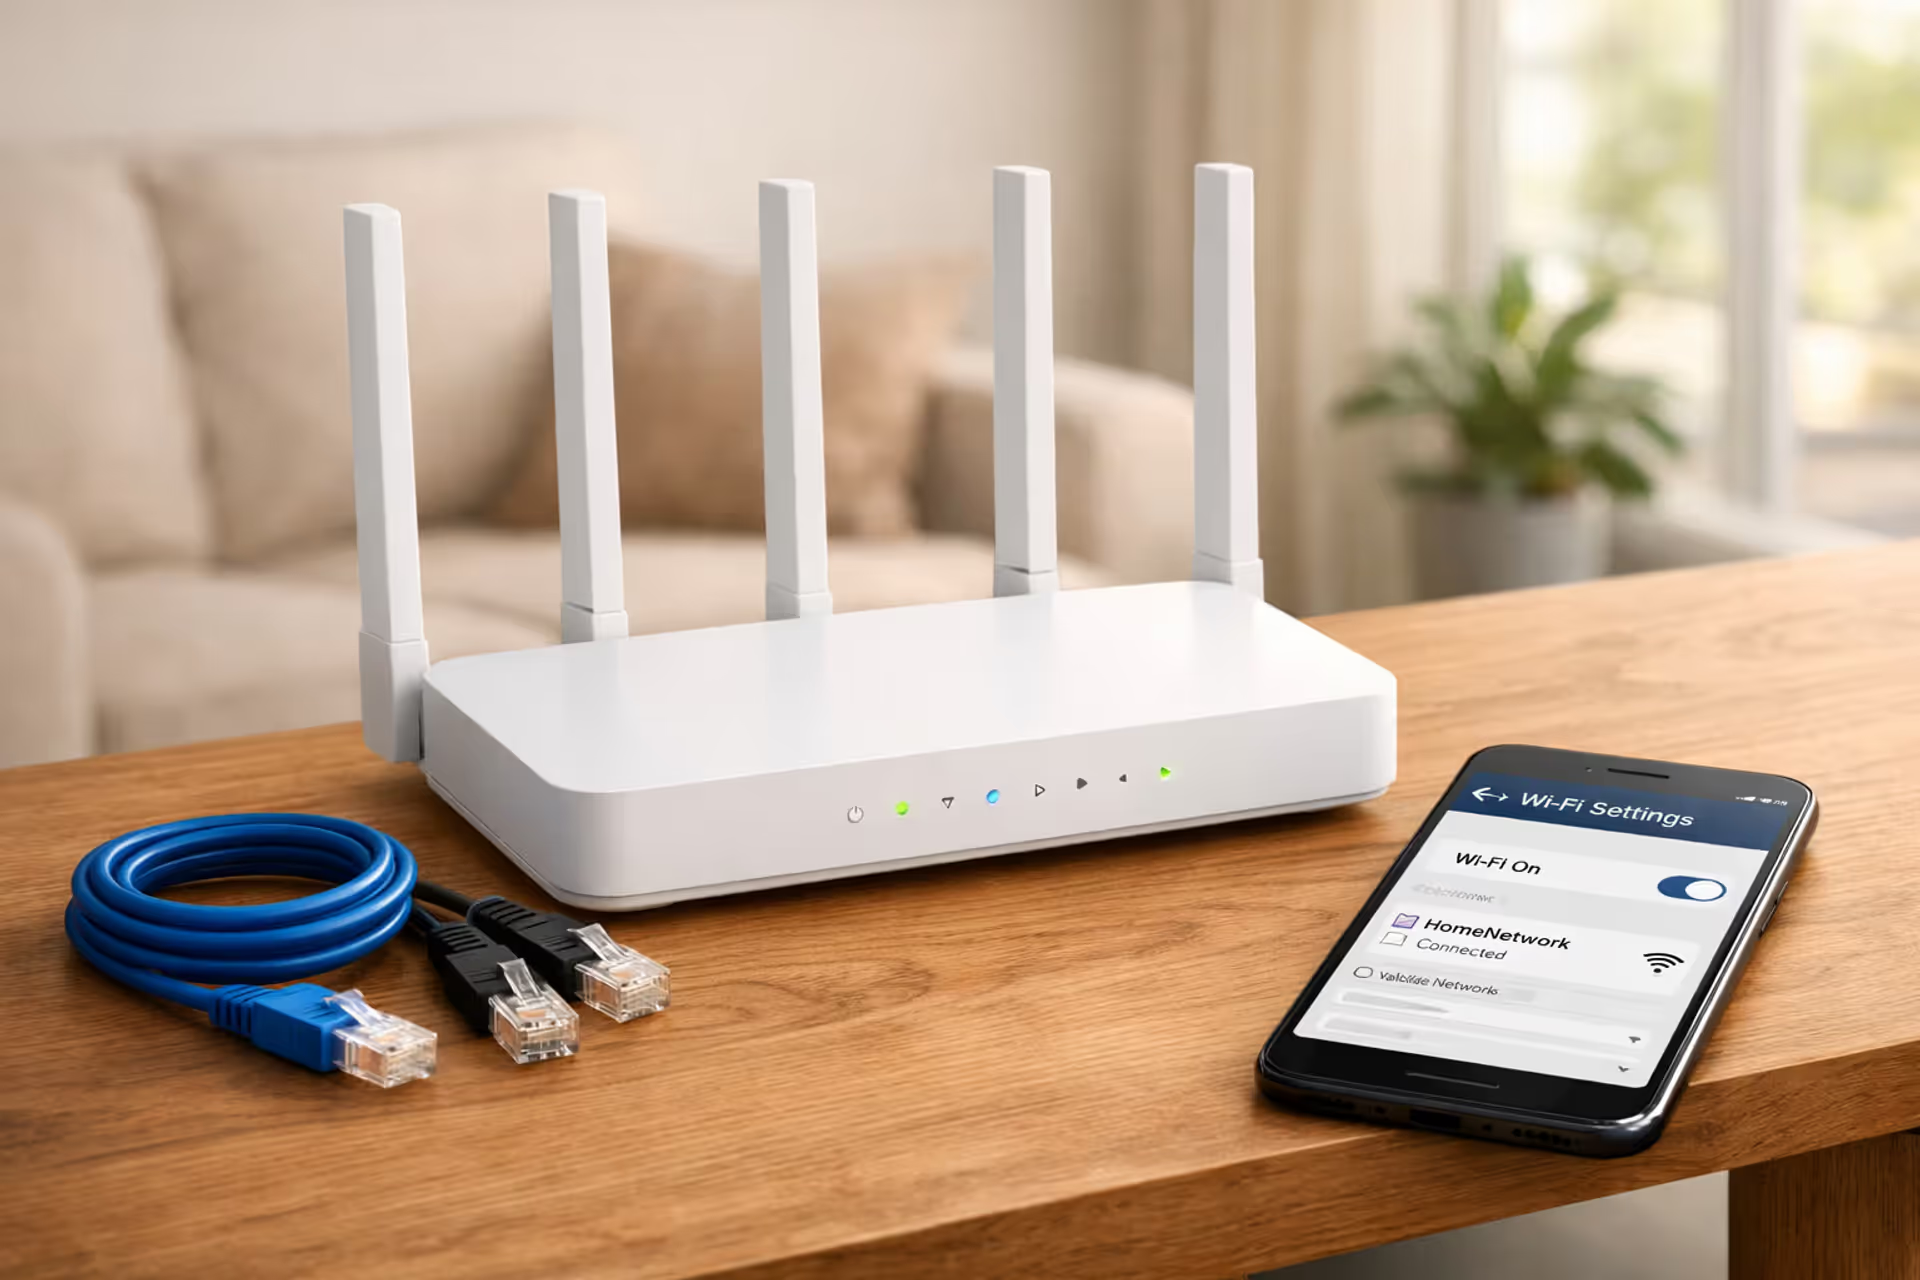
Your essential equipment: - The modem from your internet provider—or the one you bought yourself - A wireless router, which might be a separate box or combined with the modem - Two Ethernet cables (yellow or blue flat cables with chunky ends) - Power adapters for both devices - Your phone, tablet, or laptop for accessing settings
Here's the vocab lesson nobody explains well: Your modem translates the signal coming from that thick cable outside into internet your devices understand. The router grabs that internet and sprays it wirelessly through your house. Some units do both jobs in one box, which sounds convenient until you want to upgrade just the router part three years from now.
Before connecting anything, call your ISP's activation line—the number's on your welcome packet or installation card. Some providers (especially cable companies) need to authorize your modem's MAC address in their system before the green lights even matter. I've watched people troubleshoot for 45 minutes only to discover their modem was never activated. Save yourself that headache.
Flip your router over. See that sticker with printed credentials? Grab your phone and snap a picture of it—you'll need that default username and password in about ten minutes when you're three rooms away from the router trying to remember if it said "admin123" or "Admin1234."
Connecting Your Router to Your Modem
Physical connections determine whether this works at all. Miss one step and you'll be googling "why won't my router connect" at 11 PM.
Follow this sequence exactly:
- Power down existing equipment. Unplug your old router if you're replacing one. Leaving old gear connected creates IP address conflicts that'll make your new setup fail mysteriously.
- Connect the modem to your internet source. Screw the coax cable into your modem's threaded port. Fiber users: plug into the ONT box your provider installed on the wall. DSL folks need to connect through that beige filter box first, or you'll hear crackling on your landline.
- Give the modem power and wait. Plug it in. Watch the LED lights cycle through their startup—blinking amber, flashing green, whatever light show your model does. Wait until you see a steady light labeled "Online," "Internet," or "Ready." Mine takes four minutes every single time. Seeing red or no internet light after five minutes? Your provider hasn't flipped the switch yet.
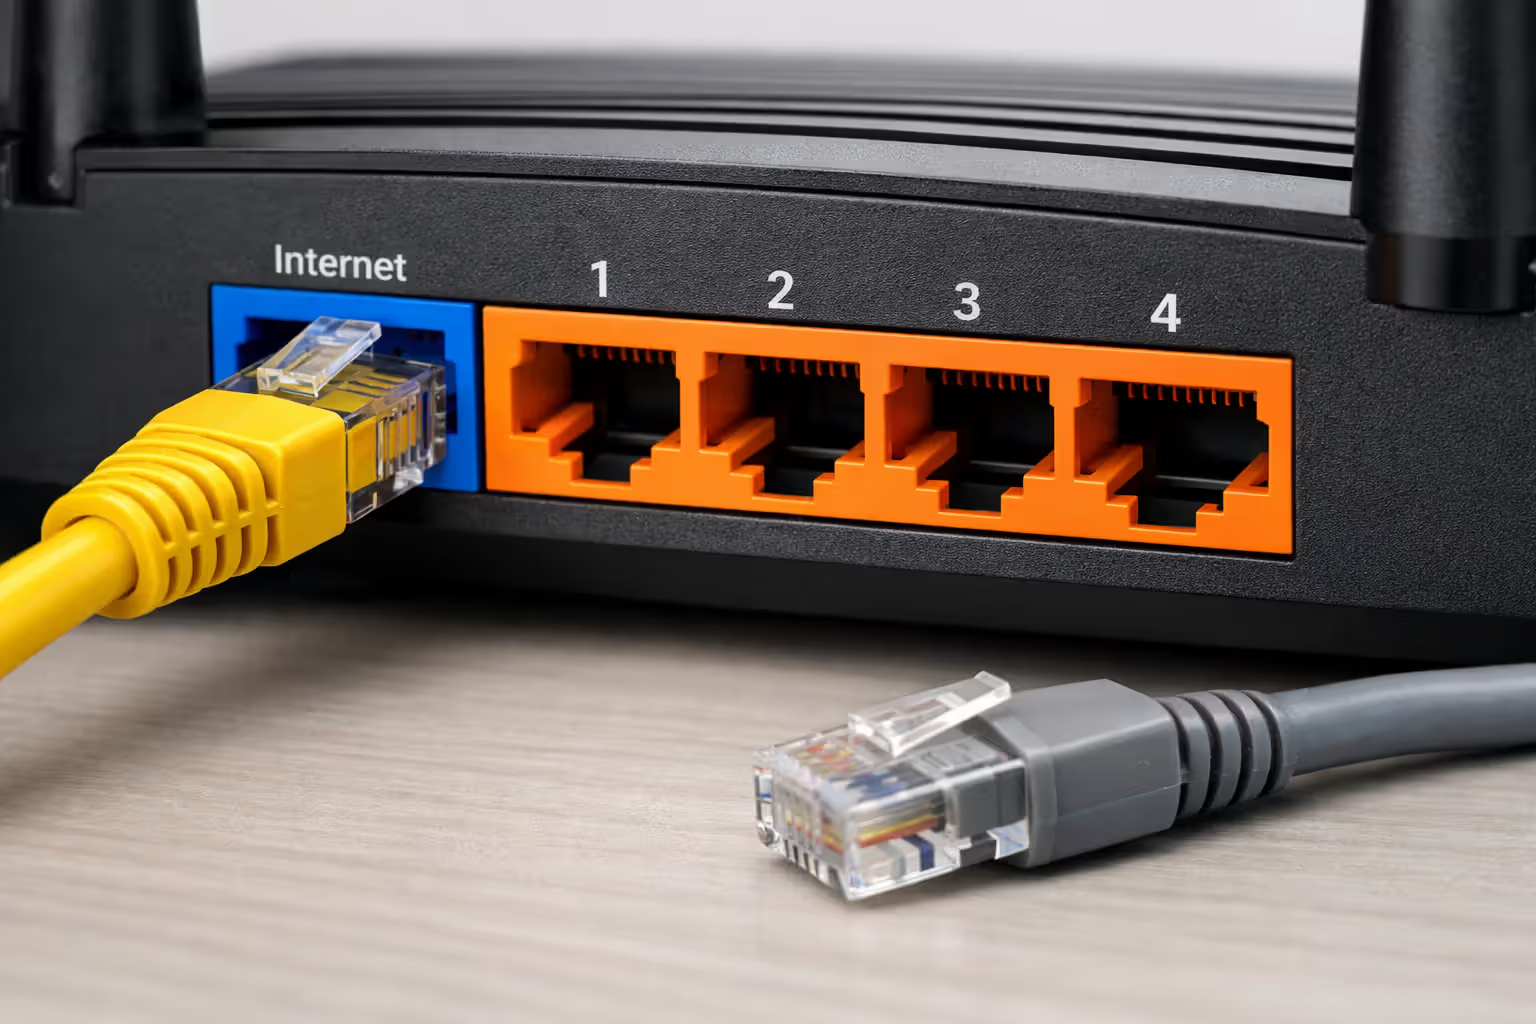
- Connect an Ethernet cable between the two devices. One end plugs into any LAN port on your modem—those are the numbered ports, usually 1 through 4. The other end goes into your router's WAN port, which sits alone and might be colored blue or yellow. It'll say "WAN" or "Internet" next to it. Don't grab one of the regular numbered ports by mistake.
- Power up the router now. Wait another two minutes while it boots. You should see lights for power, internet connection, and wireless signal. Each router uses different colors—some flash white when active, others glow blue or green.
- Look for your network on any device. Open WiFi settings on your phone. Scan available networks. You're looking for a name matching your router's label—something like "NETGEAR47" or "TP-Link-2AF9" or whatever alphanumeric nonsense the factory programmed.
When lights stay red after ten minutes or your network name never appears, the hardware handshake failed somewhere.
Author: Marcus Leland;
Source: flexstarsolutions.com
Troubleshooting Connection Issues Between Devices
Modem shows no internet despite being plugged in: This means your ISP hasn't provisioned service yet. Call their tech support with your account number and your modem's MAC address (it's on that label sticker). They'll activate it remotely. Takes them three minutes once you reach an actual human.
Router indicates no internet, but the modem looks fine: Pull the Ethernet cable completely out from both ends. Look inside the plug—see those gold pins? Sometimes one's bent. If they look straight, reconnect firmly until you hear a definite click. Still nothing? Swap in the spare Ethernet cable from the box. I've opened packages with defective cables more times than makes sense.
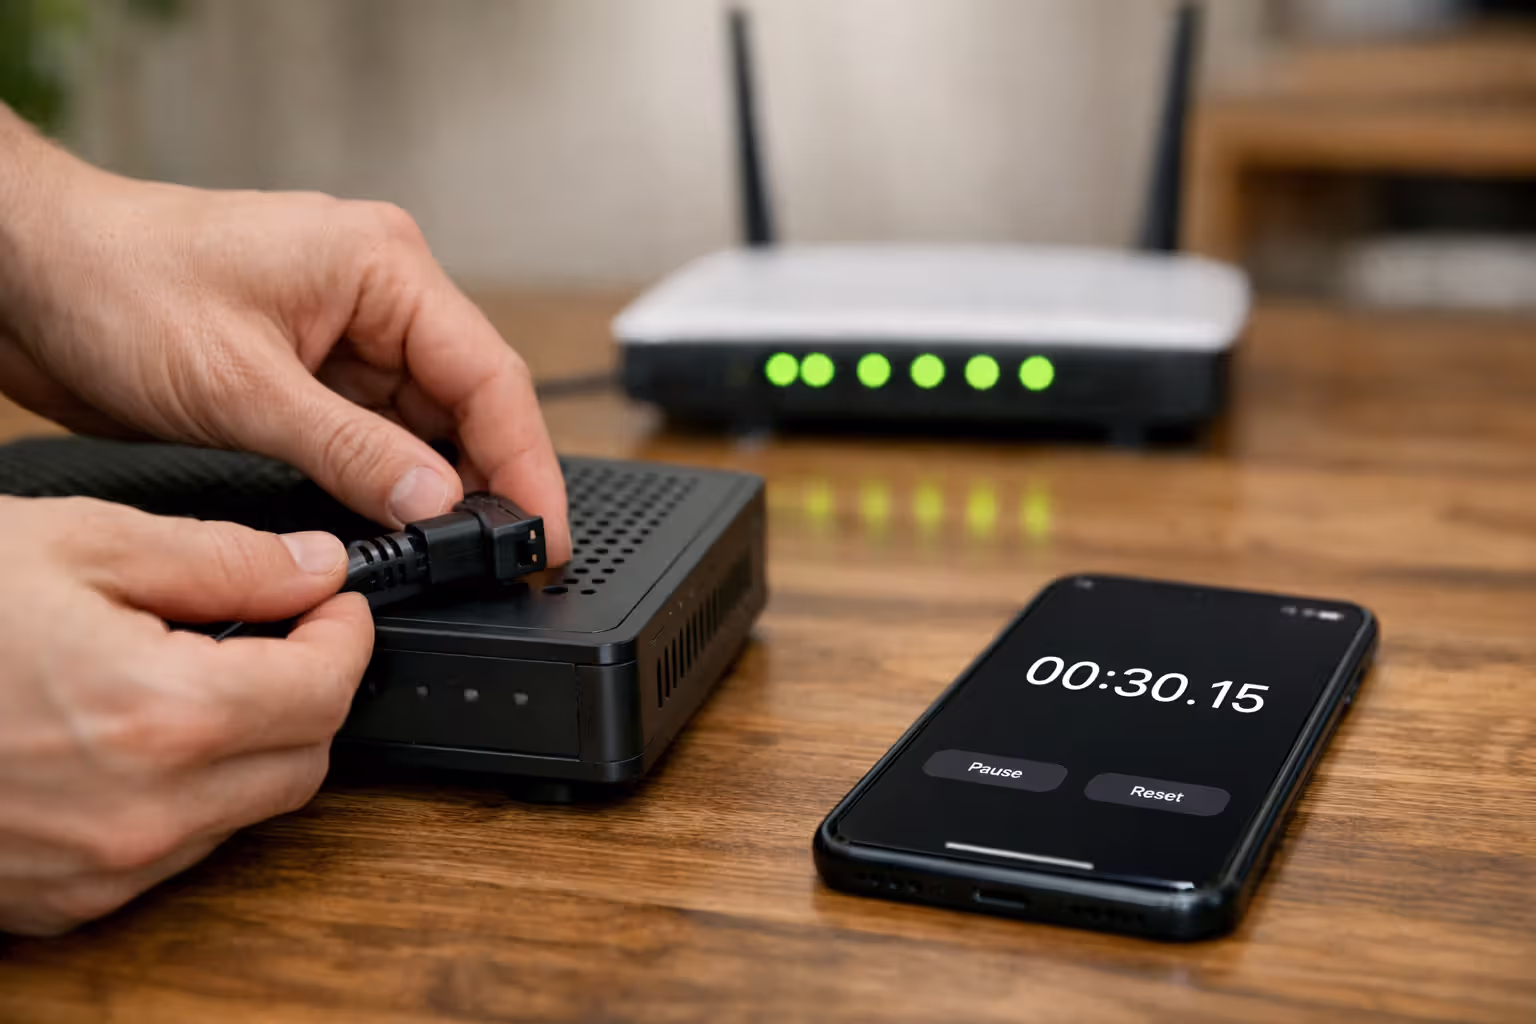
Here's an obscure fix that works surprisingly often: Unplug your modem from power for a full 30 seconds. Not 10 seconds—actually count to 30. Plug it back in, wait for complete startup, then power on your router. Modems sometimes lock onto the old router's identity and refuse to talk to new devices until they fully reboot.
Your WiFi network name doesn't show up anywhere: Verify the WiFi indicator light is actually illuminated. Some models have a physical button on the back panel labeled "WiFi" or showing a wireless icon. My brother accidentally hit this while plugging his in, spent an hour troubleshooting before noticing the button was pushed to "off." Also check if the previous owner set the network to hidden mode—you'd need to plug in via cable and access settings to unhide it.
Connected to WiFi but browsers return error pages: Your router isn't receiving an IP address from the modem. Log into the router admin page (next section covers how) and navigate to WAN Status or Connection Status. If you see 0.0.0.0 or anything starting with 169.254, that confirms it. Power cycle both: modem off, count to 120, modem on, wait for full startup, then router on.
Author: Marcus Leland;
Source: flexstarsolutions.com
Configuring Your WiFi Network Settings
Physical cables work. Now you'll build the actual wireless network and lock the digital doors.
Accessing the router control panel:
Connect your phone to that default network using the password from your label photo. Open any browser—Safari, Chrome, whatever—and type the router's IP address. Usually that's 192.168.1.1 or 192.168.0.1. Some brands use actual URLs: tplinkwifi.net, routerlogin.net, or my.router. Check your manual or the label if neither common address works.
A login page appears. Enter those default credentials from your sticker picture. Immediately the router asks you to create a new admin password. Do this now. Anyone connected to your network can access these controls if you leave the default "admin/admin" combination active.
Creating your network name (SSID):
Navigate to Wireless Settings or WiFi Configuration. You'll see fields for network names—probably two of them, one labeled 2.4GHz and another marked 5GHz. Most modern routers broadcast both frequencies simultaneously.
Choose a name you'll instantly recognize from a list of 30 networks. But don't use "Peterson WiFi" or "Unit 7B"—you're broadcasting whose network this is to everyone in range. Use something memorable without giving away personal information. I've seen "Pretty Fly for a WiFi," "Abraham Linksys," "Bill Wi the Science Fi," and dozens of puns. They work great.
Should you name both frequencies differently or identically? I prefer different names—lets me manually connect older devices and smart home gadgets to 2.4GHz (better range through obstacles), while my laptop and Roku go on 5GHz (faster speeds for streaming). Using identical names means your router auto-assigns devices, which works fine if you want one less decision.
Setting up your network password:
This password protects the actual wireless signal. Make it 12+ characters minimum. Mix uppercase, lowercase, numbers, and symbols. Skip dictionary words, names, or dates. My technique: look around the room, grab three random objects, string them together with numbers. "Bottle7calendar2lamp" beats "Charlie2019!" and you won't forget it because those objects are always there.
Enter this password in the security field beneath your network name. This is different from your admin password you just created. The admin password protects router settings. This WiFi password is what your laptop, phone, and smart TV need to get online.
WPA2 vs WPA3: Which Security Standard Should You Choose?
These encryption protocols scramble all data traveling between your devices and router. Without them, technically savvy neighbors could read your traffic.
| Security Feature | WPA2 | WPA3 | Which One to Pick |
| Encryption type | 128-bit AES | 192-bit AES | WPA3 offers stronger protection |
| Compatible with devices from | 2006 onwards | 2019 and newer | WPA2 if you own older hardware |
| Public network protection | Vulnerable to packet sniffing | Encrypts each device individually | WPA3 for coffee shop security |
| Setup difficulty | Standard process | Identical process | Literally no difference |
What to actually choose in settings? If your router offers "WPA2/WPA3 Mixed Mode" or "Transitional Mode," select that. Your 2022 phone uses WPA3 encryption while your 2017 printer still connects via WPA2. Everyone gets online.
Only showing WPA2 options? Go with WPA2-PSK (AES) or WPA2-Personal. Avoid anything mentioning TKIP—that's legacy encryption from 2002. And if your router still lists WEP as an option, honestly just buy a new router. Security researchers cracked WEP encryption in 2001. Using it now is like locking your front door with a twist-tie.
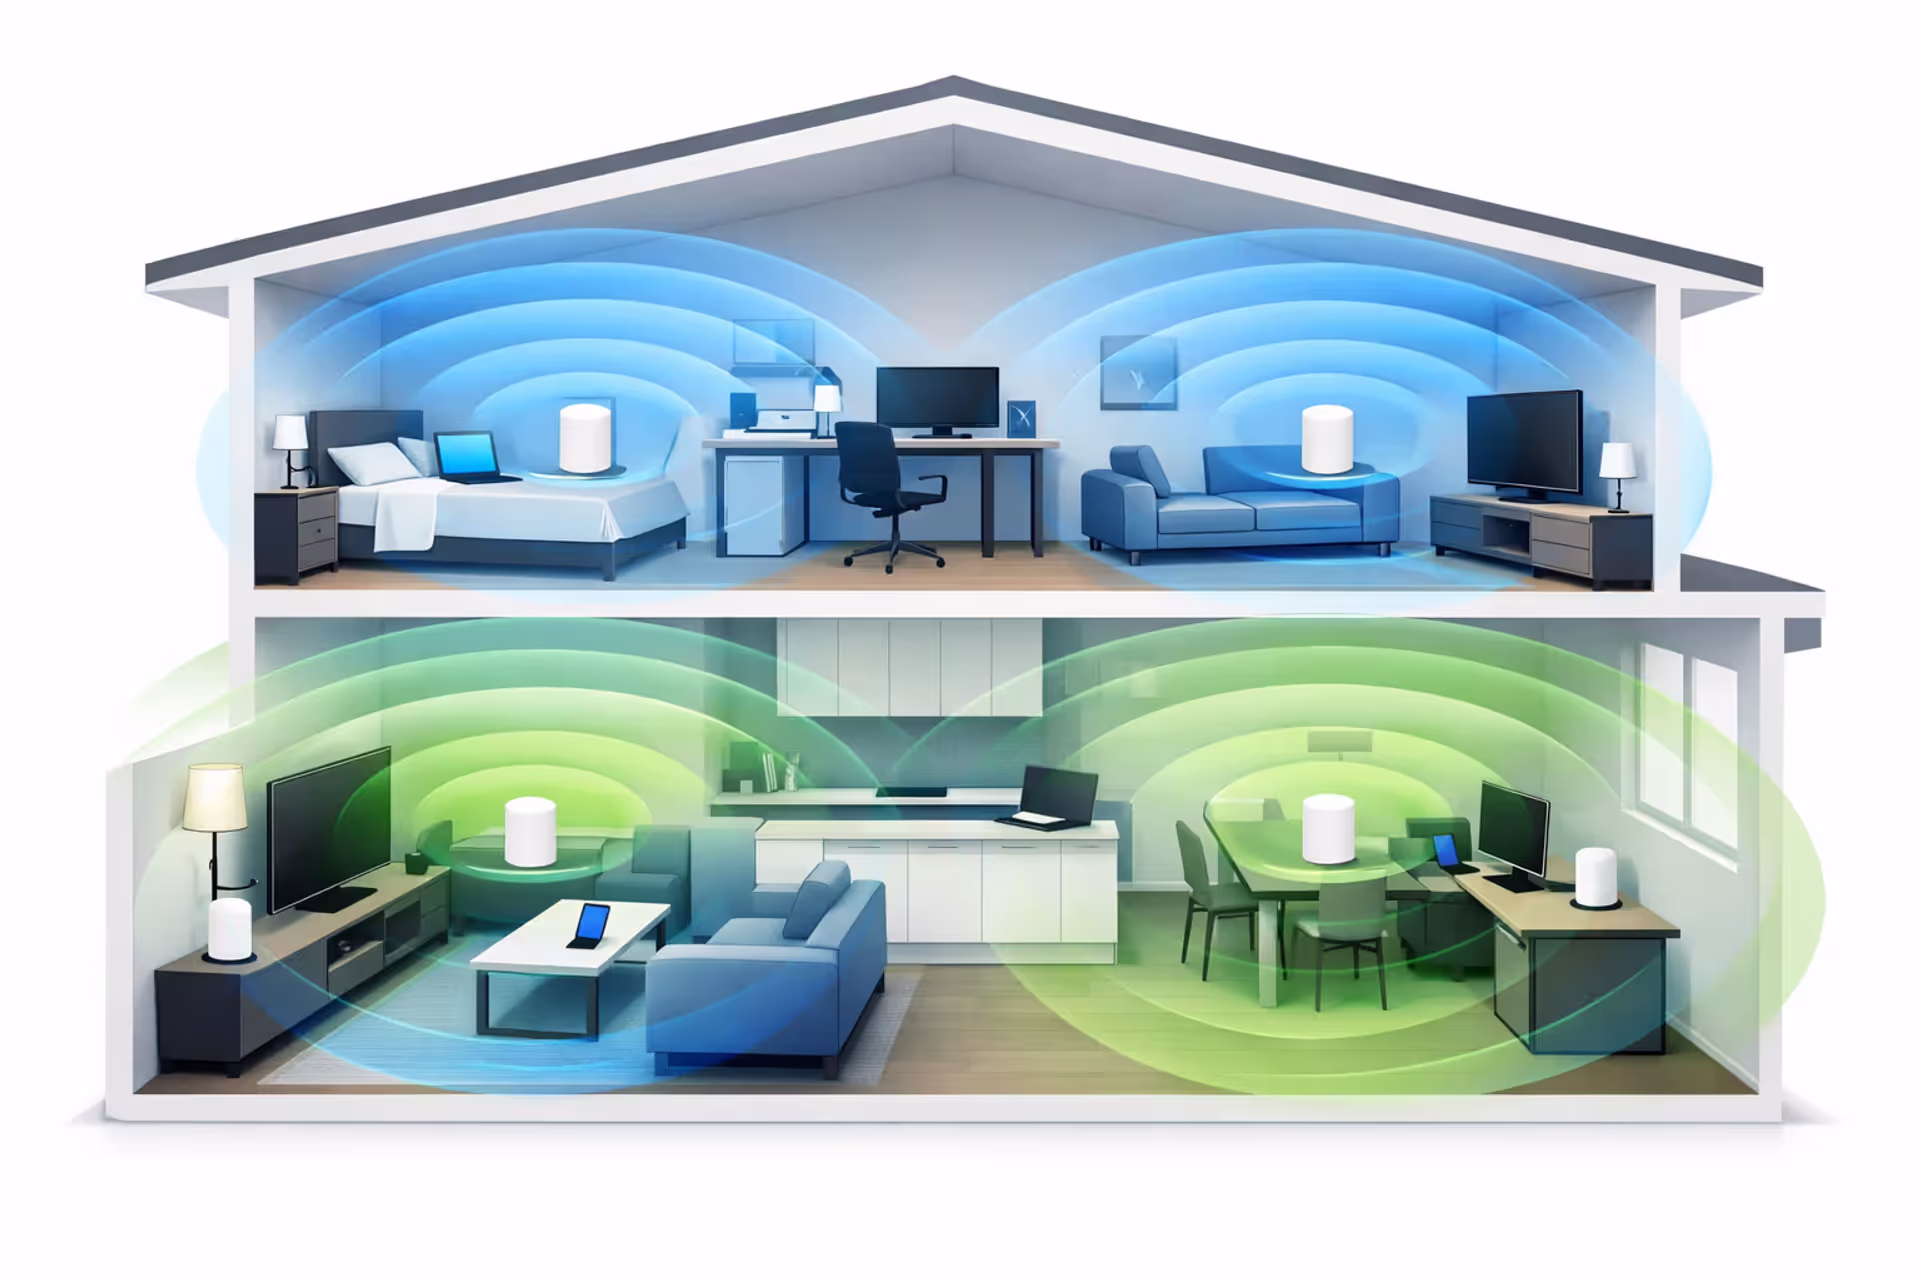
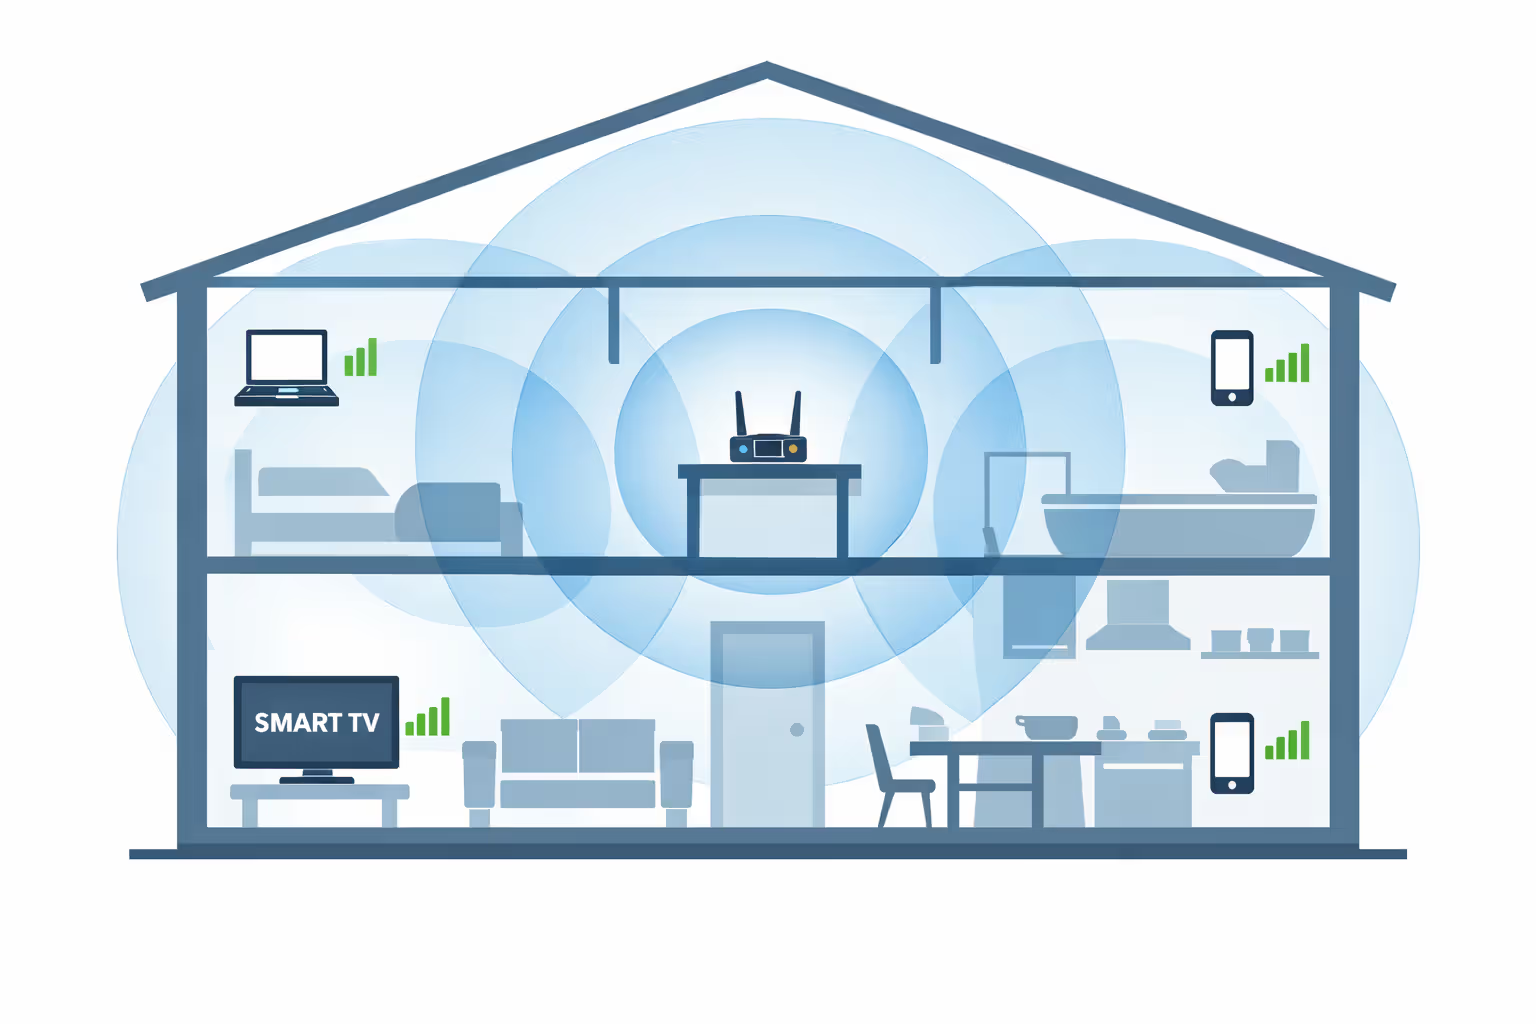
Router Placement Strategies That Actually Work
Where you physically put this box matters more than the brand you bought.
Center it in your living space, not at the edge. WiFi radiates outward in a sphere pattern. Placing your router in a corner means 50% of your signal heats up the outdoors or your neighbor's apartment. Find a spot roughly central to the rooms you use most—preferably on your main floor if you've got multiple levels—and you've eliminated half your future coverage complaints.
Elevation changes everything. Mount your router between five and seven feet off the floor—roughly eye level or higher. Signals propagate outward and downward more effectively from this height compared to floor placement. Wall-mount it if possible, otherwise put it on a tall bookshelf or cabinet top. I moved mine from behind the TV stand to the top of a six-foot bookcase and gained two bars of signal in my bedroom.
Author: Marcus Leland;
Source: flexstarsolutions.com
Materials that block WiFi signals: - Metal acts like a shield—filing cabinets, metal shelving, refrigerators, and aquariums (water plus metal frame) devastate signal strength - Concrete and brick walls reduce signal by 50-70% - Even multiple interior drywall partitions add up to significant loss - Mirrors contain metal backing that reflects signals away from where you need them
Distance from exterior walls matters. Pull your router at least 12 inches away from outside walls. Signals don't magically stop at your property line—they continue broadcasting outdoors where they're useless to you.
Common sources of interference: - Microwaves operate at 2.4GHz, identical to one WiFi band - Baby monitors and cordless phones from the 2000s - Active Bluetooth devices - Large aquariums (water absorbs radio waves) - Dense apartment buildings with 50+ competing networks
Last year I helped my cousin troubleshoot terrible WiFi in their bedroom. Their router sat in a first-floor closet next to the water heater, surrounded by concrete foundation walls. We moved it to a second-floor hallway shelf, centered in the house. Instantly their Roku stopped buffering and they got signal in the garage. Zero dollars spent, 15 minutes of work, massive improvement.
Got external antennas? Position one vertically and one horizontally. Different devices have antennas oriented different ways—laptops usually horizontal, phones usually vertical. This configuration covers both orientations.
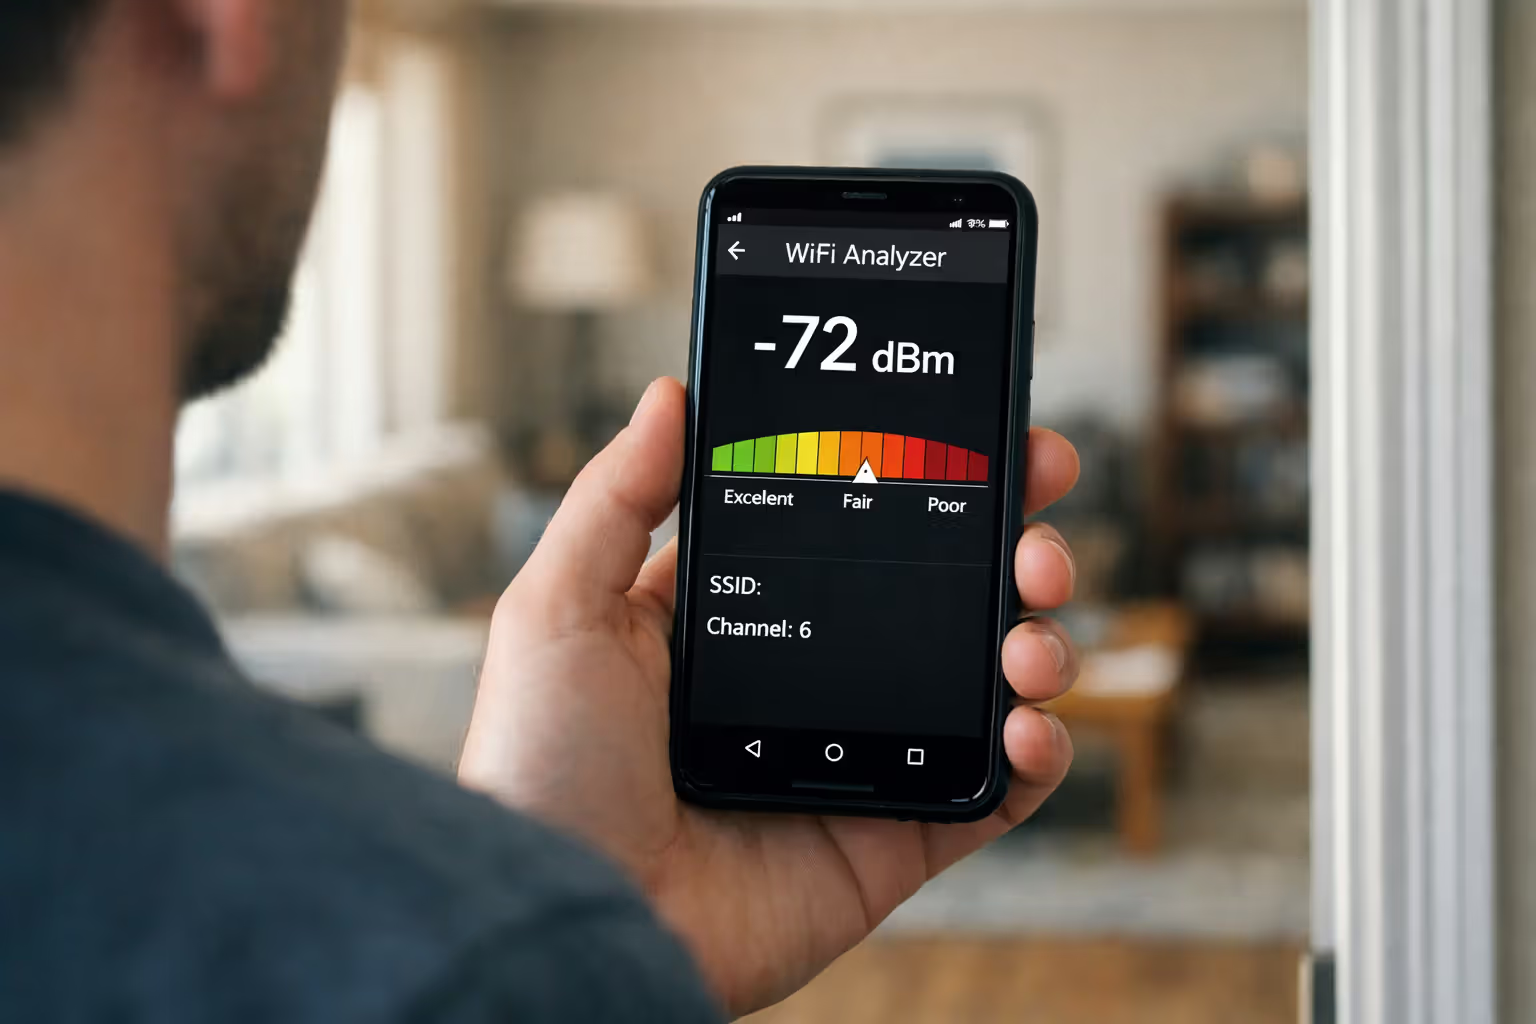
Testing Your WiFi Coverage and Fixing Dead Zones
Before spending $300 on mesh systems, actually measure what you're working with.
Proper testing method:
Download a WiFi analyzer app—WiFi Analyzer for Android, Airport Utility on iPhone (you'll need to enable the WiFi scanner in settings). Walk through every room slowly with the app running, watching signal strength readings. The dBm number tells the story—higher numbers (closer to zero) mean stronger signal.
- -30 to -50 dBm: Excellent, you're practically touching the router
- -51 to -60 dBm: Strong enough for 4K streaming without buffering
- -61 to -70 dBm: Adequate for browsing and SD video
- -71 to -80 dBm: Weak, expect random disconnections
- -81 to -90 dBm: Barely functional, essentially unusable
Author: Marcus Leland;
Source: flexstarsolutions.com
Jot down which rooms measure below -70 dBm. Those need attention.
Free fixes to try first:
- Reposition the router based on placement principles above. Test coverage again after relocating. You might solve everything with strategic placement and save hundreds on equipment.
- Update firmware. Router manufacturers constantly release updates fixing bugs, patching security vulnerabilities, and improving performance. Access your admin panel and find System, Administration, or Firmware sections. Some routers check automatically and notify you of updates. Others require downloading files from the manufacturer's support site and uploading them manually.
- Change to a less congested channel. In apartments you're competing with dozens of networks. Navigate to Wireless Channel settings under WiFi configuration. For 2.4GHz, use channel 1, 6, or 11—these don't overlap each other. Pick whichever your analyzer app shows has minimal traffic. For 5GHz, try channel 36, 40, 44, or 48. I switched from channel 6 to channel 1 and my speed jumped 40% because eight neighbors were already camping on channel 6.
- Migrate devices to 5GHz frequency. The 5GHz band is faster and less crowded, though walls block it more easily than 2.4GHz. If your laptop sits near the router but connects to 2.4GHz by default, manually switching to 5GHz can triple your throughput.
When buying equipment actually makes sense:
Tried everything and still have rooms with terrible reception? Hardware time.
Your options break down like this:
Router repositioning (costs nothing): Move it somewhere central and elevated. Requires 10 minutes. Try this before anything else. Sometimes running a longer Ethernet cable to relocate the router beats buying new gear.
WiFi extender or repeater ($25-$80): Adds coverage to 1-2 additional rooms. Best for fixing one specific problem area on a budget. Setup difficulty varies—some plug in and work, others make you pull your hair out. These catch your router's signal and rebroadcast it farther out, but they roughly halve your speed because the extender uses its radio to both receive and transmit.
Mesh WiFi system ($150-$500): Covers entire homes from 2,000 to 6,000 square feet. Best for multiple dead zones or large houses. Setup is actually easier than traditional routers—download the app and follow visual instructions. Multiple units work together as one network instead of creating separate networks.
Powerline network adapter ($50-$120): Sends internet through your electrical wiring to reach 1-2 distant rooms. Best for specific faraway spaces. Setup is moderately tricky and only works if your outlets share the same electrical circuit.
Position WiFi extenders halfway between your router and the dead zone—not inside the dead zone where signal's already too weak to repeat effectively. I see this mistake constantly.
When Mesh WiFi Makes Sense for Your Home
Mesh systems deploy multiple units functioning as one unified network. Connect the primary unit to your modem like any router, then place additional nodes throughout your house. They communicate with each other, creating seamless coverage.
Mesh makes sense when you have: - House size exceeding 2,000 square feet - Multiple floors with persistent dead zones - Three or more rooms with inadequate signal - Brick, concrete, or metal construction blocking signals - More than 20 devices connecting simultaneously
Skip mesh if: - You live in an apartment under 1,500 square feet - Simply relocating your router solves your coverage issues - Budget is tight—one quality router outperforms a cheap mesh setup
Setup is genuinely simpler than traditional routers. Plug the main node into your modem, install the manufacturer's smartphone app, and follow step-by-step instructions to add satellite nodes. Apps usually display coverage maps and suggest optimal node placement.
Popular systems like Eero, Google Nest WiFi, and Netgear Orbi include automatic security updates, parental controls, and management features that basic routers lack.
Common WiFi Setup Mistakes and How to Avoid Them
Leaving default passwords active: Every router's factory credentials are documented online in publicly available support documents. Attackers literally drive through neighborhoods scanning for routers still using "admin/admin." Change both your admin login and your network password during initial setup. This takes 120 seconds and prevents 90% of intrusion attempts.
Ignoring firmware updates: Manufacturers regularly patch security vulnerabilities and boost performance through firmware updates. Enable auto-update if your router supports it. No auto-update option? Check manually every quarter.
Hiding your network name believing it improves security: Disabling SSID broadcast doesn't actually conceal your network from anyone using basic scanning tools. It merely complicates connections for your legitimate devices. Real security comes from robust encryption (WPA2/WPA3) and strong passwords, not from suppressing your network name.
Never configuring ISP-provided equipment: Those rental modem-router combos work immediately out of the box, but they ship with weak factory passwords and sometimes outdated security protocols. Log in and configure them properly even though you're renting the hardware.
Positioning routers wherever the cable enters your house: That cable probably enters through a basement corner, back closet, or garage—essentially the worst possible WiFi location. Run a longer Ethernet cable if necessary so you can position your router somewhere central and elevated.
Letting routers auto-select channels indefinitely: Auto-channel selection works acceptably in suburbs with sparse networks. In apartment buildings with 40 competing routers, manually choosing the clearest channel creates noticeable improvement.
I've been doing home WiFi assessments for six years. The overwhelming majority of problems trace back to router placement. Homeowners configure everything in their basement or a back closet simply because that's where the cable company drilled the hole. They've essentially architected their entire wireless infrastructure from the single worst starting position in the house. Moving the router to a central hallway at chest height fixes roughly 80% of dead zone complaints I encounter. Costs zero dollars, takes 10 minutes, and clients think I'm some kind of wizard
— Maria Chen
Frequently Asked Questions About WiFi Setup
Your wireless network is operational with appropriate security, intelligent positioning, and solutions for coverage gaps. The difference between internet that constantly frustrates versus internet that invisibly works comes down to these fundamentals: securing your network with current encryption standards, positioning hardware centrally at eye level away from interference sources, testing actual coverage before purchasing additional equipment, and maintaining current firmware.
Most connectivity problems originate from placement or configuration rather than hardware quality. If you've implemented these steps but still experience issues in certain areas, actually measure signal strength there before buying extenders or mesh systems. Sometimes a $25 Ethernet cable running to a problem location outperforms a $300 mesh investment.
Bookmark your router's admin panel IP address and store your customized passwords securely. You'll need these for future adjustments, configuring guest networks, or troubleshooting down the road. Your network handles video calls, streaming on multiple TVs, smart home devices, and whatever else your household demands.